Wednesday, September 28, 2011

Food is Always Better on a Stick

I don't know about you, but I love foods on sticks.  The Renaissance Festival is my Mecca for this kind of food.  Fried cheese on a stick? Yes please! Beef on a stick? Serve it up! But what about cookies on a stick?  I was planning out a favor to make for my friend's upcoming baby shower and finally landed on big decorated sugar cookies.  But on a stick! Genius! Lets see how I did it:

Start with a chunk of your favorite sugar cookie dough straight from the fridge.   I usually break mine into three segments so that the dough stays nice and cold while you work.  Also, fun little tip: I use parchment paper as my rolling surface so that when I'm all done, I can just fold up the paper and throw away all the excess flour and bits of dough in one fluid motion. 


Make sure you use plenty of flour.  These cookies are good and chewy and can take a lot of flour and not get too crunchy.  I flour the parchment, I flour the dough, I flour the cookie cutter, I flour the dog and inevitably I flour myself.  So what I'm saying is... don't be shy with the flour. 

Once you've cut your cookie shapes (I chose a large round circle for this one) it is time to insert the stick.  When I was trying to think about how I could describe the process of insertion, it kept coming out all jumbly so I decided to show rather than tell. 


I started noticing a couple of my sticks would poke out of the cookie and I wanted to avoid them falling off the sticks, so I just patched a few where needed with some excess scraps of dough.  The beauty of doing this before they bake is that the cookie will smooth itself out in the oven.  Just face the smoothest side up so that the rough bits will flatten out against the cookie sheet.

Bake these per your standard cookie instructions.  Mine went a good 13 minutes because I wanted to make sure they weren't too soft. 

Next up... decorating! For this particular batch, I already had a design in mind.  But how cute would these look with rainbow colors all swirled together like one of those giant lollipops you get at an amusement park?

Thursday, September 22, 2011

Melly's Favorite Sugar Cookie Dough

Hi Everyone, I'm so sorry to have abandoned you.  I was on vacation and then came home and have been working on my latest baking project (see I told you I'd break the mixer out again soon.) It has been a doozy and taken me a lot longer than I initially planned.  So I have decided to break it into segments. 

Today we'll be covering my favorite basic sugar cookie dough.  I found this on iambaker and have loved it since the 1st time I made it.  It is super simple and can be tweaked to fit your personal flavor preferences. 


We start as all good recipes do by creaming the butter and the sugar in your mixer with the paddle attachment.


Once the butter and sugar are nice and fluffy, we'll add in our two egg yokes and mix until fully incorporated. 


Follow that with two whole eggs.  Once again, I cracked them into a bowl and added them one at a time.  I was running short on time and ingredients so I didn't want to risk a bad egg.


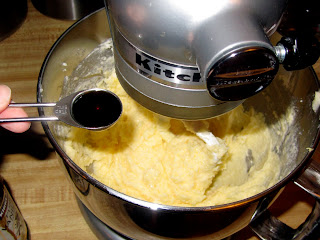
When the eggs are all mixed in, add the vanilla extract.


And the flavor extract.  Now. Amanda at iambaker uses 2 teaspoons of almond extract.  The first time I made these, I found that to be too much almond.  So I cranked it down to 1 teaspoon for the next batch.  I liked that a lot more.  For this batch I decided to go a completely different direction and used 2 teaspoons of lemon extract.  Let me tell you, it is divine.  Citrus-ey and light but still very sweet.  Any extract will do.  I think orange would be tremendous.  Try experimenting with your favorite flavor. 


Meanwhile, whisk together your flour, baking powder and salt.


Slowly add the dry ingredients to the mixer and mix until it it just barely incorporated.  You don't want to over mix.  There is nothing worse than a tough cookie (unless you are talking about a young girl with a lot of moxie.  Those tough cookies are awesome!)

Once the dry ingredients are all incorporated, scrape the dough onto some cling wrap. 


Using the ends of the wrap, work the dough into a log shape and wrap it up tightly.  I like the log because it is easier for me to break off pieces of it to work with when rolling and cutting my cookies.  You want to put this in the fridge for at least 1 hour but the longer the better. 


Next up! Rolling, cutting and baking the cookies.

Shopping List for iambaker's amazing sugar cookie recipe. (makes 36 - 40 large cookies)


  • 1-½ cup Butter (Amanda calls for unsalted.  I of course use salted and I don't regret that decision)
  • 2 cups Sugar
  • 2 whole Eggs
  • 2 whole Eggs Yolks
  • 4 teaspoons Vanilla Extract
  • 2 teaspoons Almond Extract
  • 4 cups All-purpose Flour
  • 1 teaspoon Salt
  • 1 teaspoon Baking Powder
  • Sunday, September 18, 2011

    Alan's Favorite Junk Cookies

    I'm taking a bit of a mini-break vacation this weekend (to be completely British about things) and while I'm gone, my friend Jen has agreed to do a guest blog for me.  Please welcome Jen!

    *************************************

    I was so excited when Melissa asked me to write a guest blog for her while she is away on vacation. Well, let me correct that. I asked, and she accepted. So, not quite the begging at my doorstep that I was expecting.  But I digress.  Moving on:
    Anyone that knows my husband probably knows that he is not a fan of sweets. He won’t even eat cake on his birthday! Sacrilege, I know!!  But, what very few people know is that he does have a sweet spot for chocolate chip cookies, and the ones I'm about to show you are his very favorite. I have seen this recipe called cowboy cookies several places, although I have no idea why. I usually call them junk cookies, cause they have A LOT of junk in them, but mostly in our house we call them Alan’s favorite cookie. They are super easy to make, extremely versatile, and so delicious!


    Start by preheating your oven to 350 degrees.

    In a bowl, add the flour, baking powder, baking soda, salt and oats.

    Now here comes the fun part. You will see that the recipe calls for M&M's and chocolate chips. But you can really add in anything that you want here. When I made this batch my husband was feeling a bit under the weather, so I let him have free reign of the ingredients. And here is what he chose:


    That’s right, Peanut and Pretzel M&M’s.  I was a little skeptical at first, but it is what he wanted. As for the chocolate chips, I just read an article that said that the perfect chocolate chip cookie was made with chocolate chunks and not chocolate chips! Who knew? So, I figured I would give it a shot. I bought one bar of Semi-Sweet Ghirardelli chocolate and chopped it up.


    Then, measure out the M&M's.


    And add everything to the bowl.


    It is beginning to look like a party in there!
    Next, add the sugars.


    And the chopped pecans. (You can, of course, leave these out if you have an allergy or an aversion to pecans)

    Then, mix all of the dry ingredients together until they are all well incorporated.

    That should do.
    Now, add in the egg.

    The vanilla


    And the stick of melted butter. Yes, you read that correctly. The STICK of melted butter….mmmmm…..


    Mix everything together. You can try using a spoon, but I have found that this cookie dough is so lumpy that the very best things to mix it all together are the kitchen utensils that Mother Nature provided: your hands. 


    Then take the cookie dough, again easiest in your hands, and roll it into 1-1 ½ inch balls. Of course, you can size up or down depending on your preference.  Place these on your cookie sheet.

    And bake for 10-12 minutes.


    Deliciousness!!
    Is it just me, or is there nothing happier in the world than a plate of chocolate chip cookies fresh out of the oven? By the way, the husband's verdict on this selection of ingredients? “Mmmrph good!” which I am pretty sure translates into, “They are good!”

    Also, turns out that the saltiness of the pretzel M&M’s in this recipe is genius. It really counterbalances the sweetness. And I don’t know who decided that chocolate chunks are better than the chips, but I will say that I whole heartedly agree and that all future chocolate chip cookie recipes will be made this way.

    Enjoy!!
     Shopping list for Alan’s Favorite Cookie: (Make 2-3 dozen)
    • 1 1/3 cup all purpose flour, spooned into measuring cup & leveled
    • 1 teaspoon baking powder
    • 1 teaspoon baking soda
    • 1/4 teaspoon salt
    • 1 cup cooking oats
    • 3/4 cup M&M's
    • 3/4 cup semi-sweet chocolate chips
    • 1/2 cup brown sugar, packed
    • 1/2 cup white sugar
    • 1/3 – 1/2 cup chopped pecans
    • 1 egg - slightly beaten
    • 1/2 cup butter melted
    • 1 teaspoon vanilla

    Tuesday, September 13, 2011

    Breakfast at Melly's - Potato and Goat Cheese Omelet

    My sister used to work at a restaurant near my parents' house that served a pretty dominant Sunday brunch.  And while in college, she would typically work a Sunday double shift in order to make as much money as she could in a weekend.  So my parents - being very supportive parents - would go to brunch every Sunday to see their baby girl in action.  I - being a supportive big sister - would go along with them and let them buy me brunch every week.  I'm generous like that. 

    One of my favorite things on the menu was an omelet stuffed full of their signature hash browns, sour cream and cheese.  But once my sister stopped working there and we stopped going to brunch on a weekly basis, I was left missing my favorite Potato Patch Omelet.  Until one day when I decided to make it for myself.  But better! I'd add bacon to it! And goat cheese! Be still my heart.


    This omelet is really quite hardy and does take a little longer to make than the average breakfast, so I reserve it for special nights when Hubby is out of town and I can eat breakfast for dinner.

    I start by peeling a whole russet potato.  We're only going to use half of it for this recipe, but I have something planned for the other half.  I don't have a mandolin, and even if I did I don't think I'd bring it out for a single potato.  We just want to slice the potato very thinly.


    And then stack up a few slices at a time and cut some matchsticks (or julienne if you want to be fancy about things)


    Place the whole potatoes worth of matchsticks into a bowl with very hot water.  I just run my tap for a while until it gets good and hot.  By doing this, we are basically par-cooking the potatoes a little bit. 


    While the potatoes sit and cook a little bit, put two frying pans on medium-high heat.  In the smaller one, begin cooking one slice of bacon.  In the larger one, cook two slices of bacon.  This bacon is a 40% less fat version so it doesn't generate as much grease. 


    When the bacon in the small pan is about half rendered, move it to the big pan with the other bacon and put about half of the potatoes* that you have patted dry with a paper towel into the small pan.  You are now using the bacon fat as an oil and it is delicious! Sprinkle the potatoes with a little salt and pepper at this point too. 


    *for the remainder of the potatoes, just put a lid on the bowl with the water still in it.  These will keep in the fridge for a few days. 

    While the bacon continues to render, and the potatoes start to brown up it is time to address our eggs.  I personally go with a combination of 1 whole egg and 2 egg whites.  Usually I'll use the egg whites from the carton (so about 1/2 a cup of that,) but today I was also making a cookie dough that called for 2 egg yolks.  So the timing worked out perfectly for me to use real egg whites.  You can of course use three whole eggs or three egg whites.  Whatever floats your boat. 


    I whisked my eggs with a little bit of water (maybe 2 tablespoons) and then added a pinch of salt.


    And a dash of my favorite seasoning salt. Yes, I know it says Broiled Steak season salt but believe me it is delicious on everything.  You would not believe what it does to ground turkey (but that is tomorrow's recipe.)


    Once the bacon is good and crispy, remove it to a dish lined with a paper towel and pour the eggs into the pan that the bacon had been cooking in.

    Alton Brown says when making an omelet, you should immediately stir the eggs around for the first few seconds after you add them to the pan and then roll the pan around by hold it up and rotating your wrist to fill in all the cracks and then walk away.  I did this, but it was hard to do while taking pictures so my results weren't as good as they normally are and I ended up with a few weak points in my omelet.  But you know what, it still tasted good. 


    When the eggs are almost solid - but still a little runny on top, we start building our omelet.  Begin with the now-crispy potatoes.


    Pile on the crumbled bacon.


    And a sprinkling of goat cheese.  The original omelet used sour cream and that is still very good. But I didn't have sour cream and I did have goat cheese and I do NOT regret my substitution.


    Now it is time to fold the empty side over the top of the full side.  I am super right handed, so I had to spin my pan so that the empty side would be on my right and easier to fold.  Some could argue that I could have just piled my fillings on the other side.  I didn't think of that until it was too late.  Oh well. 


    Press the top down to let whatever egg wasn't full cooked on the flip side finish cooking and adhere to the other side.  After 1-2 minutes of this, give the whole omelet another flip.  I use my spatula and a little bit of gravity to do a bit of a lame lift/flip.  If you feel secure enough to do a real Julia Child style flip, more power to you.

    Turn the heat off and let it sit for another minute or two.


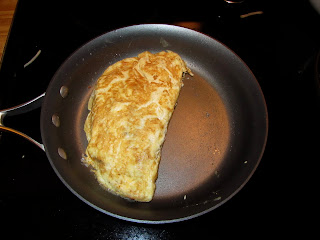
    Finally, slide the omelet onto your plate.  This way, the pretty side stays up.  If your prettier side is the other side, give your omelet one more flip before sliding. 


    I have to take a moment for a shout out to my new Calphalon Unison pans.  I got these for a wedding gift (actually one of the few things Hubby picked out) and I love them.  When they say non-stick, they mean it.  My egg cooking has vastly improved with their use.  As I mentioned, this bacon didn't yield much grease.  And you can see in that picture above that at this point the pan is essentially dry.  And yet the omelet slid out as if the pan was heavily buttered.  No, Calphalon did not pay me to say this.  They don't even know I exist.  But I just couldn't look at that picture and not proclaim how happy it made me to have that omelet slide right out so easily.

    Moving on.

    I decided to serve my omelet with a side of baby green salad topped with broccoli slaw since I was feeling guilty about eating bacon and eggs and goat cheese for dinner.  You could serve yours with fruit or with more potatoes or with some delicious toasted rye bread. 


    The goat cheese melts it's creamy tanginess all around the grooves of the potatoes and the crispy bacon.  It is salty and fluffy and super rich. 


    Yum! Look at that forkful of deliciousness! I hope you enjoy this as much as I did. 


    Shopping List for Potato and Goat Cheese Omelet (makes 1 large omelet)
    • One Russet Potato
    • One Whole Egg and Two Egg Whites
    • Three Slices Bacon (I used the 40% less fat variety.  If you don't you may have to drain some of the excess fat from the pans before cooking the potatoes and eggs)
    • 1/4 Cup Goat Cheese
    • Salt/Pepper
    • Seasoning Salt

    Sunday, September 11, 2011

    That Chicken I Love. The One With the Sauce

    Fact: my mother is an amazing cook.  After Hubby's first visit to my parents' house for dinner he couldn't stop asking me how my sister and I didn't have a line of guys out the door wanting to date us just for the meals they'd be treated to.  I especially love going to my parents' house for dinner when I get to request the meal.  I don't know how many times my mother and I have had the following conversation:

                  Mom: I'm so glad you are coming to dinner, what do you want to eat?
                  Me: Oooh! How about that chicken I love?
                  Mom: Which chicken?
                  Me: You know, the one with the sauce.
                  Mom: Oh, ok.  I can do that. 

    And sure enough, every time she knows to make me this delicious tarragon chicken.  


    Unfortunately, the number of times that we can coordinate our schedules for a small family dinner of my favorite tarragon chicken have become few and far between over the years.  So I had to ask my mom for her recipe in order to make it for myself whenever the craving hits me.  And during this week of rain, the craving hit me hard core.  

    I start with putting three chicken breasts on parchment paper. 


    Fold over the parchment paper to cover the chicken breasts and lightly pound them.  You don't want them to be too thin, just evened out. 


    See how the top 2 breasts are a little flattened out compared to the bottom breast? 


    When the chicken breasts are all pounded out sprinkle them with salt.


    and fresh cracked pepper.


    Meanwhile, fill a plate with some Italian seasoned bread crumbs.


    Add 2 tablespoons of tarragon to the bread crumbs and the mix it all together.


    One at a time, place a chicken breast onto the plate with bread crumbs and press down gently.


    Repeat on the other side. This will create a nice light crust.  Just enough for a bit of texture, but not a full on dredge.


    When all the breasts are coated, place them in a saute pan with a tablespoon of olive oil heated on medium-high.  At this point, you'll also want to pre-heat your oven to 350 degrees.


    Let the chicken breasts cook for 5 minutes on the first side.


    While the chicken cooks, give a yellow onion a rough chop.


    When the first side is brown and crispy, flip the breasts and let them cook for another 5 minutes.


    At this point, remove the chicken breasts to a plate while you create the sauce.  To do this, lower the heat to medium and throw the chopped onions into the same pan you cooked the chicken in with a little extra drizzle of olive oil.


    Add 2 heavy pinches of salt to the onions while they brown up and get translucent.

    While the onions are cooking, open up a nice high quality bottle of wine.  Nothing but the best in my house.  I dropped a whole $3.50 on this bottle.


    Once again I have to take a moment to say a little prayer of thanks that I have a Trader Joes in my life. And that Hubby has a client whose office is across the street from a Trader Joes that sells alcohol. Whenever he has a meeting there, we stock up on the Charles Shaw Pinot Grigio ($3.50) and the Joseph Handler Riesling ($4.25.)

    Go ahead and poor yourself a glass too.


    Once the onions are translucent and brown, bring the heat back up to medium - high and pour in about 1/2 cup of wine.  You can omit the wine if you have an aversion to cooking with alcohol.  It'll still taste good, but the wine definitely adds a lovely tang to the sauce.


    Let the wine reduce by at least half.  This will allow all the alcohol to cook out and give the onions a chance to absorb all the deliciousness.  While it is reducing, stir the sauce, making sure to really scrape the bottom of the pan.  You want to loosen every bit of flavor from the chicken that had been cooked in earlier.


    Once the wine is good and reduced, pour in a cup of chicken broth.  Stir it to combine and let it simmer for a minute or two.


    Add the chicken breasts back in.  The sauce should come about half way up the chicken breasts.  You can always add more broth (or wine) if you need more moisture.


    Cover the pan and place in the pre-heated oven for 20 -30 minutes.


    At this point, your house smells so good you risk sending yourself into hyperventilation by inhaling too deep and too often.  

    Once the chicken is done, remove it from the oven and let it sit uncovered for a few minutes.  Be careful, the pan is very hot.  That includes the handle.  A fact I kept forgetting while serving myself a piece of chicken and trying to steady the pan without a pot holder.


    Serve the chicken alongside a few spoonfuls of rice and a little green salad.  I also pour a few spoonfuls of the sauce over the rice.  The sauce and onions coat the rice and flavors every bite with a tanginess from the wine, earthiness from the tarragon and sweetness from the onions.


    I must advise you to plan ahead and make enough of this meal to have leftovers.  When packing up the extras, put a layer of rice in the bowl/dish and then the chicken and sauce on top.  The sauce will soak into the rice while all the flavors continue to combine and the result is truly sublime.  Sometimes, I prefer the leftovers of this meal more than the first night.

    This was absolutely the perfect meal to warm me up during a cold, rainy week.  Thanks for the recipe Mom! I love you.

    Shopping List for Tarragon Chicken (makes 4 servings)

    • 3 Chicken Breasts
    • 2 Cups Italian Seasoned Bread Crumbs
    • 2-3 Tablespoons Dried Tarragon
    • 1-2 Tablespoons Olive Oil
    • 1 Yellow or White Onion - Roughly Chopped
    • 1/2 Cup Your Favorite White Wine (I would avoid anything too sweet)
    • 1 Cup Chicken Broth
    • Salt & Pepper to Taste
    • Cooked White Rice