Monday, November 28, 2011

Cake Jars 2: Jar Harder

I get an embarrassing amount of enjoyment from the fact that in Britney Spears' video "I Wanna Go" she is seen dancing (on a car) in front of a theater showing "Crossroads 2: Cross Harder" Heeeee.  Well played BritBrit, well played.

Sometimes sequels are even better than the originals and I know (and admit in a small voice) that if Britney starred in a sequel to Crossroads, I would be in the theater on opening weekend.  Much in the same way I was for the original.

Seeing as how my original post detailing how I made cake jars is one of the most searched for posts on this site (can you believe that people actually find my little blog through google or yahoo searches???? I can't!) I figured it was only right to do a sequel and Jar Harder!


I decided this time around to do just three varieties.  I brought back the crowd favorites of Death by Chocolate and Chocolate Chip Cookie Sundae with some very small modifications and then had an epiphany as to what my 3rd flavor should be:


Tres Leches cake is one of my absolute favorite desserts.  Whenever I'm in a restaurant that serves it, I HAVE to get it and I'm always tempted to make myself a batch at home.  So why don't I?  Easy.  The beautiful heavenly delicious part of the tres leches cake is the sauce made out of a trio of milks that soak the cake and make every bite super moist and full of flavor.  Unfortunately, making a full sheet cake or cupcakes out of this is cumbersome at best.  But making it in a jar? Perfect! The jar perfectly contains all the super wet cake and sauce and making each serving perfectly portable.  

I started with two and a half cups of flour


To the flour, I added 2 cups of sugar, 1 teaspoon of baking soda and 1 teaspoon of salt


Meanwhile, whisk together two eggs


Add 1 cup of buttermilk (or what I've been using more and more frequently - 1 tbsp of vinegar and the remainder of a cup of milk)


Continue adding 1 cup of vegetable oil


Finally mix in 1 teaspoon of vanilla extract and 1 tablespoon of vinegar


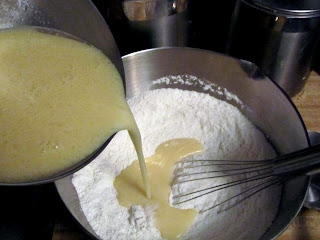
When the wet ingredients are all blended, add them to the dry ingredients


Stir until combined.  Now if this recipe looks familiar to you, it should.  This is my favorite red (or green or blue) velvet cake minus the cocoa and food coloring.  Really it is a simple, delicious, vanilla cake.


While your oven is pre-heating to 325, grease your mason jars and fill them.  I know I said that the next time I made cake jars, I'd change the size of my jars from pint to 8oz jars.  But I had pint sized jars left over so I made pint ones again.  This time though, I filled the jars to the 6oz line on the jar.  And I used a measuring cup to pour the batter in which helped keep the sides of the jars neat and clean.


When the jars are ready, I put them in a roasting pan just to make putting them into and taking them out of the even easier.


Bake the jars for 45 minutes or until they develop a golden hue and start to pull away from the sides of the jar.


While the cakes are cooling, mix together a jar of condensed milk, a jar of evaporated milk and 2 cups of milk.


Mix your tres leches together and let the mixture sit until the cakes are good and cool.


When the cakes are cooled, take a pop stick and poke holes all the way down all over the cake.


Next, pour the milk mixture into the jars up to the top.  When the mixture soaks in, top it off and put the jars in the fridge for at least an hour or until all the milk soaks in.


After a few hours, take the jars out of the fridge and carefully pour off any excess liquid


Top off the jars with my favorite cooked frosting and some white chocolate ganache I made by melting 1 cup of white chocolate with 1/2 cup of milk and 1/2 stick of butter.


Resist the urge to dip your spoon in right now


 To finish off the jars I wrapped a few pieces of raffia around the neck with a cute little label indicating the flavor.


Shopping List for Tres Leches Cake Jars - makes 6 - 8 jars

Cake

  • 2 1/2 Cups Flours
  • 2 Cups Sugar
  • 1 Teaspoon Baking Soda
  • 1 Teaspoon Salt
  • 2 Eggs
  • 1 Cup Buttermilk
  • 1 Cup Vegetable Oil
  • 1 Tablespoon Vinegar
  • 1 Teaspoon Vanilla Extract
Sauce
  • 1 Can Condensed Milk
  • 1 Can Evaporated Milk
  • 2 Cups Milk
Cooked Frosting

  • 1 Cup Milk
  • 5 Tablespoons Flour
  • 1 Cup Butter
  • 1 Cup Sugar
  • 1 Teaspoon Vanilla


Wednesday, November 23, 2011

Thankful for Dessert - Day 4: Layered Spice Cake

Several years ago my friend Jen invited me to her wedding cake testing.  To be fair, we carpooled and she wanted to go on her way home one evening so I was invited by default.  She had 3 cakes for tasting that day and the first two were very good.  When the third one was served I decided to pass.  Jen and her parents and the baker all asked me why I didn't want the third cake - a pumpkin spice cake - and I explained because I didn't like pumpkin.  They tried to convince me and I kept turning them down.  Finally after listening to them all ooh and aah over the pumpkin spice cake, I buckled and had a fork full.

To say the heavens opened up and a choir of angels sang would only be the slightest of over statements.  My life was forever changed.  A few months later, at the wedding I may have had 3 slices of pumpkin spice cake.  I didn't regret it then and I still don't.

You might be saying.  But Melly, the title says Spice Cake, not Pumpkin Spice Cake.  Which, is true.  I made this cake for my family's Thanksgiving dinner (naturally I volunteered to make dessert) and my mother does not like pumpkin (I tell her she has to try it, she refuses) and we'll also be having pumpkin pie so I decided I should omit the pumpkin from the cake so that she could enjoy some dessert.  And you know what, it is still darn good!


Start by adding the flour, sugar, cinnamon, all spice, ginger, nutmeg, baking soda and salt in a bowl


After you whisk the dry ingredients together, crack four eggs in a bowl


Add a cup of oil


And vanilla extract


Next add some fat free sour cream.  If you wanted to make pumpkin spice cake instead of just spice cake, you'd add a 14oz can of pumpkin puree instead of the sour cream.

 or

Add the wet ingredients to the dry and whisk it together until well combined

 or

Evenly pour the batter into three well greased, floured 9" pans and bake at 350 for 22 - 25 minutes.

When the cakes come out, let them cool slightly and then layer the three cakes in their pans with a piece of parchment paper and then one of the next cakes (in the pan) on top of that and put the stack in the freezer.  This will help flatten the tops of the cakes, keep the edges straight and make the cake much easier to frost.

Let the cakes freeze for at least an hour, but over night preferably.

When you are ready to frost with Cream Cheese Frosting  place a dab of frosting in the center of a cake board.


Take the cake layers out of the freezer and remove them from the pans, keeping a piece of parchment between the layers.


Place the first and second layer flat side down and the a dollop of frosting in the center of the layer and spread it to the edges.


Continue to layer and frost for all three layers.  On the final layer, place the flat side up.


With an offset spatula, spread frosting along the edge - make sure to spread the frosting up above the top of the cake.


Frost the top


Finally, go around smoothing and removing the excess frosting.  PS, I love this little tool.  I got it in a decorating pack from Ikea and it has a smooth edge, notched edge, grooved edge and a wavy edge.

When the cake is smoothed, put it in the fridge for at least 30 minutes to firm up a bit.


When you remove it from the fridge, trace out the words on top using a toothpick to make sure you have enough room and everything is evenly spaced.


Once you are satisfied with your spacing, trace over the etching with colored frosting.


I decided to use my scraper tool to put a groove pattern into the sides.  And then using a star tip, make a nice little border along the bottom and top.


I cannot wait to dig into this beautiful cake! Must resist the urge!


I hope you all have a wonderful Thanksgiving!

Shopping List for 3-Layer Spice Cake (serves 12)

  • 2 Cups Flour
  • 2 Cups Sugar
  • 2 Teaspoons of Ground Cinnamon
  • 1 Teaspoon of All Spice
  • 1 Teaspoon of Ginger
  • 1/2 Teaspoon of Nutmeg
  • 1 Teaspoon of Baking Soda
  • 1/2 Teaspoon of Salt
  • 4 Eggs
  • 1 Cup Oil
  • 2 Teaspoons Vanilla Extract
  • 16oz of Sour Cream or Pumpkin Puree
  • 1 1/2 portions of Cream Cheese Frosting

Tuesday, November 22, 2011

Thankful for Desserts - Day 3: Pumpkin Cake Balls

For a long time I did not like pumpkin flavored desserts.  I know! I was horribly naive.  But I love all the cute pumpkin themed dessert ideas that come up in autumn and stick around until right after Thanksgiving. They are so cute and festive and I love the warm colors.  One of my favorite items for a Thanksgiving dessert table is Pumpkin Cake Balls.  These delicious little bites of heaven don't necessarily have to be pumpkin flavored.  In fact these little cuties are filled with a delicious mix of spice cake and cream cheese frosting that - seriously y'all - tastes like a Hostess Donut Stick. 

Yep, I pulled out a y'all.  I mean business with this one.


One of the things I love the most about cake balls (and cupcake bites and cake pops) is that almost everything you need is store bought/from a mix/jar but you put it all together in a way that people are ALWAYS floored by the results.  And really, the possibilities are endless.  These pumpkins could just as easily be snowballs or beach balls or turkeys or faces or anything that the amazing Bakerella has on her site or book. 

To make the pumpkins in question, we start with a baked spice cake.  I used a box mix for this batch.  Just follow the baking instructions on the box, bake the cake and let it cool. You could obviously make your own, but the flavor and moistness are really non-factors in this recipe since the first thing you are going to do is crumble it up. 


Next, add almost an entire can of cream cheese frosting to the mix.  Yes.  Can.  I LOVE home made cream cheese frosting and on top of a cake or cupcakes, there is no substitute.  But in a cake ball, it doesn't matter and I personally find that using the can helps me standardize the amount of frosting I use and the consistency.  And it saves me a whole mess of clean up. 


Using a wooden spoon - or your hands - mix the frosting and the cake together until it forms an even dough.  Pssst... this (and the crumbling) are GREAT tasks to have kids do. 


Cover the dough and put it in the fridge for at least an hour.  The colder it is, the easier it'll be to work with it later.  Once it is good and chilled, roll the dough into balls about the size of a quarter. If you want them to be bigger or smaller, that is your prerogative.  I find the quarter size to be a perfect 3-4 bite treat.  Set the balls on a parchment lined baking sheet and put them back in the fridge for 30 - 45 minutes. 


When your 45 minutes are just about up, melt your chocolate in a small microwave safe bowl.  You want there to be enough depth in the bowl to dunk the balls. You can melt the chocolate in the microwave for 30 second intervals, stirring in between. Or you can use a double boiler. 

Let me take a moment to talk about your candy melts/chocolate.  You guys, I cannot stress enough how important it is to use the good stuff.  I have been known to run to Michael's or Wal-Mart and grab a bag of the Wilton candy melts.  It is super convenient and they come in all sorts of colors.  And that is fine.  If you are using a mold for cupcake bites or cake pops.  But for the dipping and retrieving that needs to happen with cakeballs you should avoid the Wilton candy melts like the plague that they are.  They never melt enough, so they end up super thick or burnt.  They coat really heavily and gloopy (is too a word!) and they cause more frustration then they are worth.  If you have a baking supply store near you, they will sell the good stuff.  Or you can order them off the Internet.  My bake shop has little 1lb bags in seasonal colors for about $4.  Which is more expensive than the Wilton stuff yes, but it melts SO much nicer and goes on SO much smoother and thinner that you can really make it go further and you'll be saved the expense of buying a wig after you've torn out all your hair using the Wilton melts.  If you don't have a baking supply store near you and you don't want to order off the Internet, you can use a good bar of chocolate like Ghiradelli and maybe temper it with some almond bark (in either brown or white) You can then add colorful accents like a nice drizzle with the Wilton melts.  And obviously, you can choose to say "nah Melly doesn't know what she's talking about, I like Wilton melts and I'll keep using them" and you're right, you can do whatever you like.  Just my two cents about the ease of using good quality tools.  

**steps off soap box and returns to the kitchen**

So anyways, pretend I took a picture of the dipping process because I'm not an airhead.

After you have dipped a few, insert a small piece of pretzel into the top of your ball for the pumpkin stem.  You want to do this before the chocolate hardens so I'd dip roughly 5 balls, put the stems in and then dip 5 more. 

Once you have dipped and stemmed all your cakeballs, put them back in the fridge for at least 30 minutes to harden the chocolate. 

Meanwhile, get some green candy melts (this time it would be ok to use Wilton) and melt it up.  Put the melted chocolate into a piping bag fitted with a #3 tip to add the vines.  I started by circling each stem, and then making a little ribbon shape or two down the body of the pumpkins.  This is a great way to hide any imperfections in your cakeballs.  Like the big gash in that one on the middle/right. 


PS: The bright orange smooth ones were made using the good candy melts.  The ugly brownish, lumpy ones were made using the Wilton melts. There, I'm done, not another word about it.

When you are done making the vines, put them back in the fridge for a few moments just to really harden up all the chocolate.  And voila!


An adorable and tasty little pumpkin patch for your holiday table.  If you keep these in the fridge in an airtight container lined with wax paper (and with wax paper between each layer) these pumpkin cakeballs will be good for up to 2 weeks. 

Shopping List for Pumpkin Cake Balls (makes 50 balls)
  • Spice cake (or any flavor cake you prefer)
  • 1 jar of cream cheese frosting
  • 2 lbs orange candy melts
  • 1/4 lb green candy melts
  • 25 pretzel sticks (cut in half)
Enjoy!

Friday, November 18, 2011

Thankful for Desserts - Day 2: Camo Cookies

As we approach the holiday season and I pause to think about the things I am thankful for I have to remember our armed services.  Both my grandfathers have been in the military - my American Grandpa was in the Marines during WWII and my Brazilian Vovo retired from the Brazilian Calvary as a Three Star General - and Hubby spent 4 years in the army and so for Veteran's Day this year, I decided to make him a special treat. 


Since Hubby loves my sugar cookies I knew the best way to show him how much I appreciate what he did for our country was in cookie form.  And when I found this cookie one day at Sweet Sugar Belle I knew exactly how the cookie would look.

I started off as I always do with my favorite sugar cookie recipe.  The last time I asked Hubby what flavor I should make them he replied "nomnomthesameasthisonemmmmmm" as he munched on the Baby Shower Cookie Pops I'd made a few weeks ago.  So lemon was clearly the flavor I chose for this batch as well. 

Once they were baked and cooled, I outlined the cookies with tan icing. 


While the outline dried a bit, I made up the rest of my royal icing colors of tan, brown, olive green and dark green and got them to a good flood consistency and poured them into squeeze bottles. 


Side note: Yes, I recently purchased this kit of 12 americolors gel colors, and I've been having a maaaaaaarvelous time playing with them.  Why do you ask? 


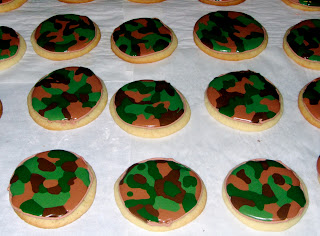
Anyways, back to the cookies.  Starting with the lighter colors, randomly add random shapes into the center of the cookie.  I did about 4 random spots for each color in random sizes.  I eventually started making random letter shapes like K or M.  The icing oozes into itself so by the time all the colors are in you can't really see the letters anymore but for me it was an easy way to get a shape other than a blob.  (the secret word of the day is "random")


Next I went back through and added a few random shapes of the light brown.


Next up was the dark green


And finally fill in any remaining blank spots with the dark brown. 


Now just let these dry overnight and they are good to go on their own.  Or you can be like me and never be happy with the easy way of doing things.  I went in and added a dark green border with a small star tip to some of them.  To others I added a white chocolate yellow ribbon.  And still others I left plain. 


Make these and send them to your favorite armed service member today. 

This is MY favorite one: