Showing posts with label cupcake topper. Show all posts

Tuesday, February 14, 2012

The Perfect Way to SayYou Care - Conversation Heart Cupcakes

I know I don't usually post twice a day (heck, I'm lucky if I can get two a week done) but today - since it's Valentine's Day - I decided I couldn't not share these with you.  And since they start with a red velvet cupcake which I posted about earlier today, they kind of go together.

When I think of Valentine's Day, I think of two things: Whitman's chocolate sampler and Necco Conversation Hearts.  I always hated the conversation hearts.  They are very cute and they are a standard - especially in elementary school when the whole class exchanges valentines - but to me they are deceptively chalky and boring.  I've heard that in recent years, Necco has remade them and they are now fruity and more like sweet tarts, but I haven't tried the new variety because I can't get over the memory with how they used to taste.  But regardless of how I feel, there is no denying that Conversation Hearts are a quintessential part of Valentine's Day.  And now, I've finally found a way to share Conversation Hearts and still like the taste of them!


How cute are these?? They start with a basic red velvet cupcake and cream cheese frosting (or really any flavor combination that you feel like using) with the charm being in the cute little fondant toppers with conversation hearts messages written with food coloring markers.  At first I didn't love that the markers gave kind of a faded look to them, but then I opened a package of the candies and I realized in real life, the color is faded.  Done and done.

Working with fondant tends to be a little intimidating, but for a small cupcake topper, it's actually not that hard.  You will need some wax paper, crisco, toothpicks, food writer markers, gel food colorings, white fondant, a cutter (heart in this case), gloves and a rolling pin.


Line the counter with some waxed paper and put a little piece of the fondant down.  Make sure to keep the fondant you aren't using wrapped up so that it doesn't dry out.  Using a toothpick, add little bits of color at a time.  For the conversation hearts, we want some nice pastels so less is more with the food coloring.


While wearing the gloves, knead the color into the fondant as if you're playing with silly putty or pulling taffy.  Use a little bit of crisco if the fondant starts to get too stiff.

To roll out the fondant, put another piece of waxed paper on top of the pile and roll it out.


Again, you can use a little crisco to rub out any lines that may have been left by the waxed paper.  And then just punch out a bunch of hearts.


Transfer the hearts to a cookie sheet lined with more waxed paper.


Proceed with the rest of the colors: pink, yellow, orange, green and violet.  Technically, conversation hearts also come in white, but a white heart on top of white frosting is a little boring.  Set this sheet aside in a cool, dry area to dry for a few hours.

Funny, I totally had a sweater with this pattern when I was younger and I would totally wear it on Valentine's Day

After a few hours, when the hearts are all good and dry, it is time to write the messages on them.


Half of these got some pretty generic, friendly messages since they were going to my father's office.  But the other half got the classic messages like "be mine," "kiss me," and "xoxo."


To decorate your cupcakes, you can do a nice flat swirl of frosting.  I chose not to do too high of a pile, instead swirling from the inside out, so that the hearts had a good flat surface to sit on.


And then just place the hearts on the center and they are ready for you to tell someone how you really feel about them.


I hope you all have a wonderful Valentine's Day and take the time to tell someone how you feel about them.

Monday, August 8, 2011

Old McMelly's Farm... Cookies

I set upon a valiant project recently.  I volunteered (read: begged) to do the cake for my nephew's upcoming 2nd birthday.  The theme was farm animals and I knew I wanted to do cupcakes which would just be easier and more manageable for a 2 year old.  Plus, that little muffin loves my cupcakes.

The problem was, I couldn't find any good examples of farm animal cupcakes.  Sure Betty Crocker has their version, but since the majority of the party guests were going to be over the age of 8, I wanted something a little nicer and not so covered in marshmallows and coconut.  Next I considered creating a topper out of chocolate molds.  But the closest option I could find was this mold.  Which would have been nice to have when I did a jungle animal baby shower a few months ago.  But for this, they wouldn't work.  Finally I found these amazing little cupcakes.  But the problem was I have never worked in fondant and have none of the tools needed.  So that wouldn't work.  But it gave me an idea.  What about a cookie topper, made to look like animal faces?  Perfect!

Uh, apart from the one, obvious, tiny, little baby little hiccup
I've never [seriously decorated cookies] before?
Yessir!
A tiny insignificant detail.
(name the movie... anybody? anybody? is this thing on?)

I had tried my hand at decorated cookies this past Christmas and made some passable ornament place card cookies.  But they weren't great.  And they were just solidly filled with some dots.  So how hard was this going to be right? I'm not gonna lie, those puppies you see up top took me 3 batches.  I definitely learned some lessons along the way, and I have some things in mind if I were to do a 4th batch (don't worry Hubby, I won't... yet) But let's see how I did them step by step shall we? 

I started with Amanda at iambaker's amazing sugar cookie recipe.  This dough came together really easily, but I would highly recommend letting it chill for a full day, and then cut the dough in quarters to roll it out.  The colder the dough is when it hits the oven, the less spread your cookies will have.  I felt like the almond flavor was a little strong so in batch 2, I reduced the almond extract by 1/2.  This resulted in a more subtle flavor and it also was a little less gooey.   Another note to add: Amanda says to cook for 6-8 minutes, I baked batch #1 for 8 minutes and they were still kind of under done.  Which usually, I'm happy about, but for decorating, they were a little too flimsy.  For subsequent batches, I upped the cook time to 11 minutes and they were perfect.  I especially liked that regardless of how much flour I used, the cookies stayed soft and chewy and never got too crunchy.  And as you can tell I used a lot! 

The next step was icing the cookies.  I heard really good things about Bake@350's royal icing so I decided to give it a whirl.  I liked the addition of the corn syrup since I felt it made the icing taste a little bit like marshmallows.  But here is where I hit the most of my snags.  

My first batch took forever to dry.  I'm talking, 4 days.  And when it did finally dry, the flood icing was all bubbly and airy.  So after a bit of research, I chalked it up to a week of super high humidity and over thinned flood icing.  For the first batch, I had tried using jimmies as cow horns but they looked a bit too anemic.  And I had done the pig noses as a flat dot in the flood.  Sadly, no pictures exist of this first batch, as they were hideous!

With my second batch, I made a couple of changes.  First, I changed the way I was going to do the cow horns - this time I was going to try tootsie rolls as kind of a modeling chocolate.  Secondly, I decided to add lambs into the mix as well as some number "2" cookies.  Finally, I changed the way I was going to do the pig nose.  I didn't want it to be flat, so I kept that darker pink a little drier so that it would stay firm.  I also erred on the side of too little water in the flood.  Which made it really really hard to spread.  But hey, it dried.  Well.  Mostly.  The cows never dried for some reason.  

Which brought me to the third batch.  I started with the cows.  These were the ones that had the most issues.  I had planned on making some black icing to make the spots but despite using an entire pot of black gel food coloring, my icing looked purple.  And my cutting board and fingers were tinted black/purple for a week.  Luckily, I didn't throw it away.  So 3 days later, I noticed that the black tinted icing had actually turned black.  This was the only motivation I needed to try a 3rd batch.  It was during this batch that I stumbled upon the culprit of my sticky cookies.  I wasn't using enough powdered sugar.  I was converting the 1lb called for in the recipe into 16 oz which I figured would be 2 cups.  But in reality, I needed more like 3 cups of powdered sugar.  Finally I was on to something.  I also tried yet another new option for the cow horns - just using more of the muzzle colored icing and piping horns the same way I had piped the duck beak.  My latest cows turned out so nicely, I redid the lambs and the chicks and decided to make some more number 2s.  

Success! 

Here is how each design broke down:

For the cows, I outlined half in white and half in beige, I then flooded the two halfs with their matching colors.  Next I made the black into a flood and used the same technique as making flat dots but put the dots really close together so that the shapes bled together.  After waiting about an hour, I took more of the outline thickness of the beige and piped little horns. 

For these little piggies, I simply outlined and filled in a light pink.  After waiting about an hour for the flood to thicken up a little, I used a darker pink thinned just slighting with a little water and piped with a #5 tip.  

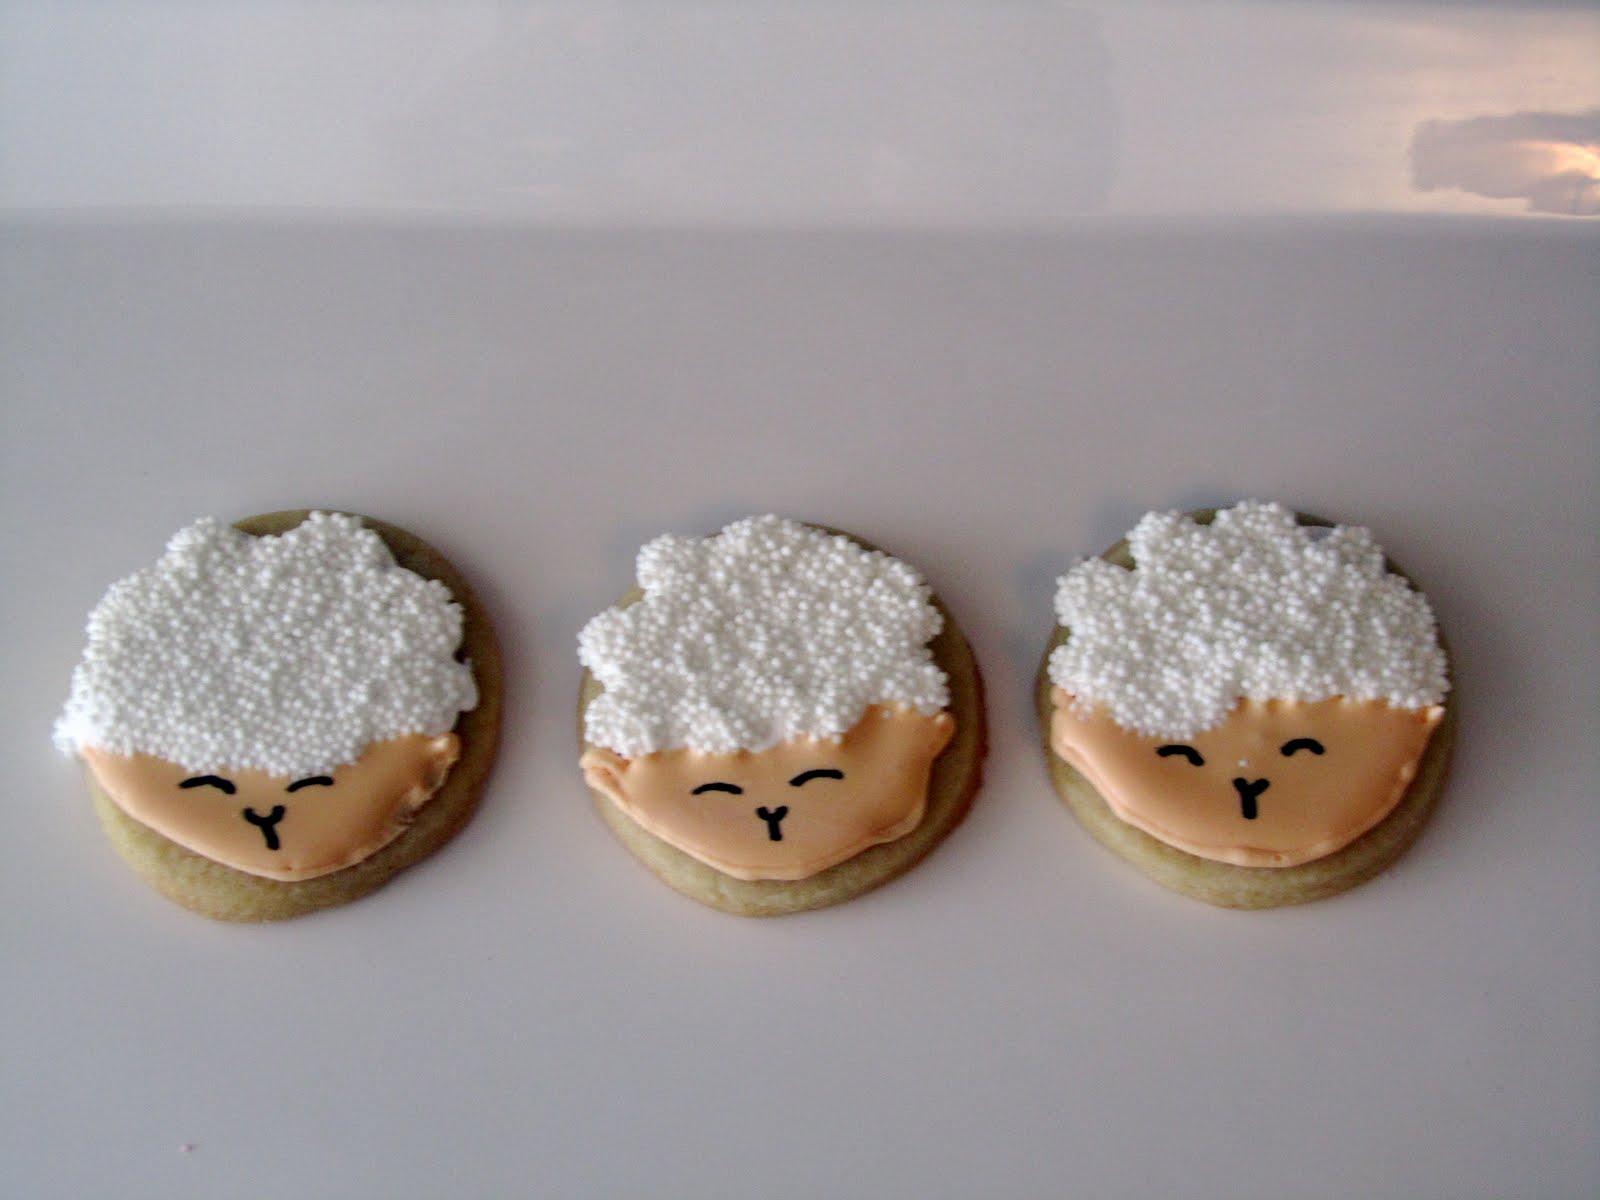
For the lambs I started by piping a cloud shape with white and then just filling out the bottom circle with the same beige as the cow.  I then flooded the top of the heads with white and then dipped them into some non-pareils.  Once they tried a little, I flooded the rest with the beige.  

The chicks were very simple, much like the pigs.  All one color except for their noses.  After the yellow flood icing dried for about an hour, I piped a little orange beak on.  The feet and eyes were done with food coloring markers. 

Finally the number 2s.  These were a last minute decision but I am so glad I did them.  I just outlined and flooded the cookies in white and then with red icing thinned almost to a flood level, I piped in the 2.  I decided that the edges looked a little rough so I took a small star tip with the outline icing and made a super cute little border. 

I think I love the cows the most.  No, I love the 2s the most.  No... wait, the lambs! Or maybe the pigs.  No definitely the cows.  I can't decide.  But luckily, I don't have to.  

I drew on the faces with food coloring markers and I decided to be super anal and mirror the faces after the invitation.  

I really love the way they turned out.  Of course, if I had more time, I may have done a 4th batch.  But I didn't, there is a lot more to do for this party.  Stay tuned to see how these super cute cookies become even cuter cupcakes.  And the other awesome thing I am going to be doing with cupcakes.